Goats Cheese Millefeuille

cropped-P20160521193324-2.jpg
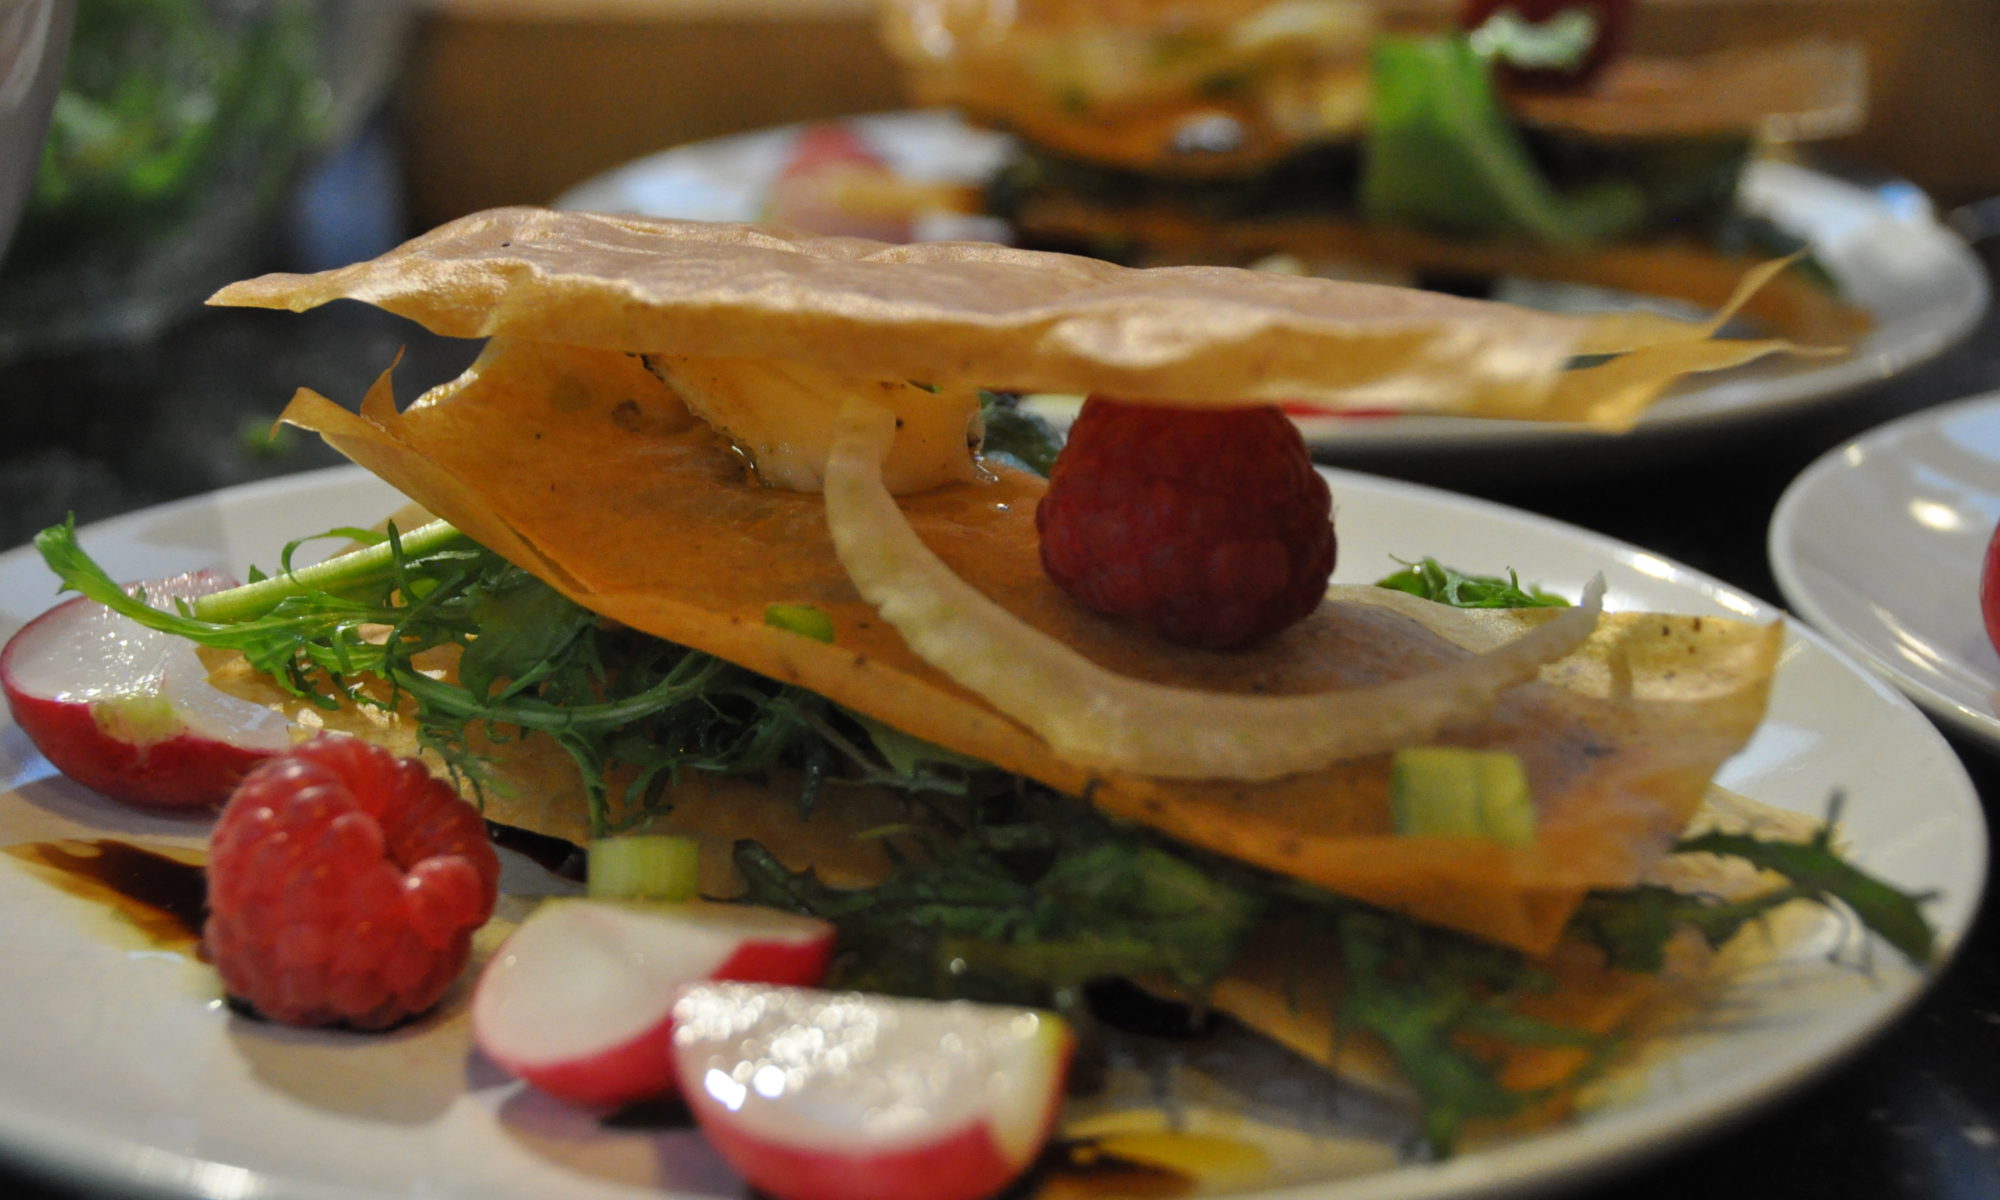
Well, I say millefeuille but really we are talking about three sheets of double-layered filo pastry, but it does make for an excellent starter!

It’s impressive, it has the Wow! factor, and it isn’t all that hard to make. A great way to start a dinner party.

My Goats Cheese Millefeuille is a small stack of double-layered filo pastry, flavoured with fennel pollen and baked crisp. In between the sheets is an assortment of textures and flavours such as molten goats cheese, roasted beetroot, raw fennel shavings, raspberries and blueberries.

The exact choice of incredients for the filling isn’t very important so long as they combine well and offer variety in texture and aroma.

Goats cheese is required unless you change the name of the dish. I usually use the types which are rolled in ash, and melt them in a frying pan with a spot of butter.

Roasted beetroot, lightly tossed with balsamic vinegar, a small splash of lime juice and a sprinkling of salt works beautifully.

Soured cream will provide moisture, or perhaps a spoonful of roasted fennel puree, the Missus’ favourite.

Raw fennel shavings are always nice and, speaking of shavings, Parmesan cheese shavings could also work well.

A fruit component is, in my opinion, essential. Fresh raspberries, blueberries or blackberries work well and look great. Blood orange or grapefruit fillets could also work if your citrus fruit filleting skills are OK; the fruit can’t be soggy or it ruins the filo.

For the filo sheets, the method is simple:

Buy a pack of good quality filo sheets. Prefer the not frozen variety if you can. Roll out one, and cover generously with melted butter (warm, not hot!). Give it a generous sprinkling of fennel pollen, then add another sheet of filo pastry. Not everyone has fennel pollen in the spice cupboard (and it is a little bit on the expensive side unless you are foraging). Alternatively, course black pepper or fresh nutmeg shavings also work well.

Cut the double-layer into the required size, maybe as large as a playing card, using a pair of scissors. Place on baking parchment, then bake at 190 C until dark golden, approximately 10 minutes.

Take out of the oven, very gently transfer onto a cooling rack and leave there until it is time to assemble. Use the pictures and your own imagination as a guide!

Vegan Tomato Tarte

IMG_20180822_195506.jpgThis was very moorish and a good addition to my vegan repertoire: a tomato tarte.

Instead of the usual puff pastry used with Provencale tarte, which is rich in butter and not suitable for vegans, I made a light and crisp pizza base. I covered this with tapenade from dried tomatoes, garlic and black olives. I added a rich layer of extra lush and tasty beefsteak tomato slices, sprinkled with salt and chilly oil.

Vegan-approved!

Courgette Relish

IMG_20160730_125140.jpgIs it a relish, or is it a pickle?

I don’t know, but it is a good way of using up surplus courgettes and is very tasty with cheese.

Grate about 1 kg of courgettes into juliennes. Add a red pepper, two red onions, one glove of garlic, perhaps an apple, all finely diced. Add two teaspoons of salt, mix well, cover and let rest for 24 hours.

On the second day, combine 300 ml cider or white wine vinegar, 200 ml water, 4 tablespoons caster sugar, two teaspoons turmeric, ground coriander and ground ginger each. Optionally add chilli for heat or a cinnamon stick for depth, and two or three star anise are never a mistake in my view.

Bring this to the boil, then reduce to a simmer. Drain the courgette mix and add to the hot liquor. Let it rest for 2..3 minutes, perhaps adding a little cornflower to thicken the liquid slightly.

Meanwhile stearilise jam jars in the oven at 140 C for 15 minutes, then fill with the hot relish, close the lid firmly, sterilise at 80 C for 20 minutes and let cool down.

Goats’ Cheese Tarte

IMG_20170311_160713.jpgThis is a scrumptious goats’ cheese tarte, which makes for a great vegetarian lunch or supper.

Gremolata-coated goats’ cheese cubes, topped with honey and orange glazed shallots, beetroot and creme fraice, baked on a sheet of ready-rolled puff pastry. Looks delicision, tasts delicious, what’s not to like?

Thaw one sheet of ready-rolled puff pastry.

Parboil three medium-sized beetroot for 12 minutes, then drain and let cool down slightly. Put on some disposable gloves, peel and dice the beetroot, then toss with a tablespoon of good quality balsamic vinegar.

Peel a handful of shallots, cut in half and gentry caramelise with a tablespoon of butter, honey and orange marmelade each. I also like a red chilly in the mix for a little bit of background heat. After caramelization starts, pop the whole thing in the oven at 170 C for 10..15 minutes.

Meanwhile, make the gremolata: a bunch of parsley, two tablespoons of breadcrumbs, a tablespoon of pine kernels, a tablespoon of grated unwaxed lemon peel, a teaspoon of crushed black pepper. Blizz until smooth.

Dice enough goats cheese to cover 3/4 of the puff pastry sheet loosely. Toss the cheese dice in the gremolata.

Pre-heat your oven to 200 C.

Spread out the puff pastry sheet, then use a knife to mark a one inch border around the edges. All your toppings stay within that inner square: spread the coated goats cheese, add the beetroot dice, add an occasional half teaspoon of creme fraiche. Put the caramelized onions on top and drizzle a small amount of the onion’s cooking licquor across.

Finally, fold up the puff pastry edges to form a tray, and brush the outsides with a mixture of equal amounts of one egg yolk and milk.

Pop into the oven for 20 minutes or until the pastry looks just right.

Eat while warm, but note that everything on this tarte retains heat pretty well. You’ve been warned!

Carrot Soup

carrot-soup.jpgFrom the vegetarian department:

Carrot and Ginger Soup, served with a poached egg and herbs.

Simple and delicious, but takes a little time to cook.

750g carrots, trimmed and cut into chunks,
2 thumb-sized pieces of fresh ginger, pealed and crushed,
1 medium sized onion,
1 large clove of garclic,
1 bulb of fennel, trimmed and cut into chunks

Heat 2 tablespoons of olive oil and one tablespoon of butter, then add all the chipped vegetables and fry until caramelization begins. Add two teaspoons of freshly grond black pepper, two teaspoons of salt, 1 teaspoon of crushed coriander seeds, 1..2 dried red chillies. Toast the spices, then add 1 1/2 litre cold water. Bring to the boil, then let simmer until the carrots are tender (approximately 60 minutes).

Meanwhile, finely chop a handful of parsely. Add a pinch of salt and 2 tablespoons of warm olive oil. Toss, let sit in a dish.

When the carrots are tender (but no need to cook them to death!), remove the ginger and chillies, then run the remaining soup through the blender to obtain a smooth paste.

Serve with a spoon of soured cream, topped with a poached runny egg. Drain the parsley with some kitchen tissue and sprinkle it on the soup. Add freshly ground black pepper and a drizzle of rapeseed oil or chilly oil.

Rosehip Jam

IMG_20151108_171421.jpgWalk over the fields in October or November, and you’re bound to find rosehips along the edges of the field. It’s well worth gathering a few even if you must pay the price with stings, scratches, and loss of blood.

Rose hips are full of vitamin C and make for a delicious jam.

You need a little over 1kg rose hips for 2..3 jars of jam. You also need a little time over several days:

(1) Wash the rose hips in cold water, and shake the remaining water off.

(2) Trim the bottom and top ends off, and slice the rose hips slightly. (A small cut will do.)

(3) Put the rosehips into a dry pot, close with a lid, and leave to wilt in the shade on the kitchen top for 2..3 days. You’ll find that the smell increasingly fruity over the wilting period.

(4) Add clean water, just enough to submerge all the rose hips, and gently bring to the boil. Add a spoon of sugar and simmer for 5 minutes, stirring frequently. You’ll be surprised what a thick paste you get right away. This burns easily, so make sure to stir well around the edges frequently.

(5) Pass this through a fine sieve. Nothing for the lazy cook, but think of the rewards!

(6) Repeat steps (4) and (5) with the left-overs (seeds and whatever else you didn’t pass through). This second batch will be thinner but increases the overall yield, and is still pretty fruity. You might want to skip the B-grade addition if you are working towards an entry at the WI’s rose hip jam competition.

(7) Now look what you’ve done: you made some very fine Marc de Rose Hip. Weigh it.

(8) Add the same amount of jam sugar by weight, stir well and let the sugar disolve. Gently bring to the boil, stirring continuously. Add juice from 1/3 lime per 500g of marc. Simmer for approximately 7 minutes, still stirring continuously.

(9) Rinse clean jam jars in very hot water, fill with jam to one finger from the rim, and tightly close the lid immediately. Do not touch or move until they are cooled down and have sealed themselves. There is no need to faff about with waxed or drunken papers or some-such in my opinion.

(10) Label, store in the larder, give a gift to a friend, or sample it first and then decide to keep it all to yourself.

Tomato Jam: A Lynch Job

20140901210114.jpgKevin Lynch of Closet Cooking inspired this Tomato Jam with his original recipe.

I never followed his recipe, but end up with a coffee-free and much spicier variety, which we find looks and tastes fantastic on bread with a fried egg, as the tomato layer on a pizza, or with egg-rich Pappadalle or Fettuccine. So, here goes one fairly large batch:

Wash and dry 4kg ripe tomatoes, then cut into eights. Place the pieces, skin-down, next to each other on large flat baking trays and slowly dry in the oven at 95 C for 2..3 hours. Stop when they are still slightly moist, but no longer wet. You may need to do this in batches, depending on your oven. I get 2 kg on each tray, but a convection oven takes 2 trays with ease. I open the door every 20 minutes to let the steam out and to wipe off the condensation. You’re trying to evaporate over 3 litres of water, so give your oven a hand.

When dried, let them cool down (and dry out even more).

To make the jam, do this:

Blizz the tomatoes into a puree, skin, seeds and all. This should have a slightly moist yet rich and thick consistency.

Toast one large tablespoon of coriander seeds, one large tablespoon of fennel seeds, 3 dried red chillies, a teaspoon of fenugreek seeds and 4 star anise. Transfer the hot spices to your pestle and mortar or spice grinder.

Add a splash of olive oil to the same pan and crisp 200 g of streaky dry-cured bacon or panchetta.

Meanwhile, grind your spices and enjoy the delicious aroma. Sieve to remove stalks and husk. Add a teaspoon of ground cumin.

Mix the ground spices with the tomatoes, then blizz the bacon into small bits and add to the mix.

Season to taste with balsamic vinegar, salt, pepper and brown sugar.

Done.

Set some aside for tonight or tomorrow’s lunch.

Fill the rest into preserving jars and preserve in a Baine-Marie at 85 C for 90 minutes.

Open Spanakopita

cropped-DSC_0668.jpgSpanakopita is a Greek spinach tarte. This is a slightly up-market version: instead of a flat tarte with a varying degree of density, soggyness and puffyness, our open Spanakopita is baked as a stand-up roll of filo pastry with the traditional spanakopita filling of spinach, feta cheese and pine kernels.

This makes a generous lunch for two, or a delightful starter for four.

500g frozen leaf spinach
100g Feta cheese
flat green parsley, toasted pine kernels, egg, breadcrumbs, salt, pepper, nutmeg

Optional: rich strained yoghurt (strained sheepmilk yoghurt preferred)

Optional: ground almonds

Pack of frozen filo pastry sheets

Begin by thawing the spinach, then squeeze it as dry as you can. Mix it with a handful of flat parsley, chopped, a handful of breadcrumbs, 2 whole eggs. Optionally also add 2 heaped tablespoons of yoghurt. If you can’t find strained yoghurt, strain it with a sheet of muslin. Mix this well, best using the hands.

For the filo, prepare 75g slightly salted soft butter.

Spread out one sheet of filo pastry, brush with soft butter. Optionally, thinly sprinkle some ground almonds across the sheet, then cover with the next sheet. Repeat this process to get three of four filo sheets combined in this manner.

Crumble the feta cheese and distribute evenly across the filo pastry. Sprinkle with the toasted pine kernels, then add the spinach mix (strain if too wet!) to form an even layer. Now roll the flat cake into a roll, and glue the ends together with buttered filo. Wrap with a sheet of baking parchement if necessary, then cut into thick slices.

Use the remaining filo to make a little bottom for each slice.

Bake at 190C for approximately 20 minutes. Decorate with a poached quails egg, or edible flowers.

Parfait

cropped-DSC_0898.jpgNothing beats a freshly churned ice cream, but these Parfaits come pretty damn close. The best thing is that they can be done and dusted a couple of hours earlier, or even a day or two before the event, so you don’t have to worry about anything at all during the meal, or after main course has been served.

We make them in little conical ramekins of anodised aluminium (~100ml). These take a nice portion size each and are easy to manage both in terms of portioning, freezing and getting out.

The sweet parfaits are all made in the same manner, but you need to decide which flavour to add. We love a Hazelnut or Pistacho Praline. Crushed and sugared Poppy Seeds were pretty popular, and I guess a generous helping of Orange Oil, maybe with tiny dice of crystalized Orange, would also work nicely.

To make a praline, shell the nuts. Toast them if you want. Prepare a caramel from 100g sugar, dissolved in 1 tablespoon of water, on moderate heat (and while not stirring). When the caramel turns into the appropriate colour, remove from the heat, add the nuts, then spread the lot thinly on a sheet of baking paper or slilicon. Let cool down completely, then crush in a blender to the desired consistency.

For the parfaits, beat 1 medium-sized free range egg yolk per portion. This takes some while, so it is best to use a kitchen machine rather than a hand mixer. Beat the yolks until they turn very pale from the trapped air. Meanwhile, dissolve one tablespoon of castor sugar with a tiny splash of water and put on moderatee heat just as if you were cooking a caramel. This time, you’re done just before the mix gets a colour.

While the egg yolks are still being beaten, slowly pour in the hot sugar sirup. This will cook the eggs. Keep beating the mix to prevent lumbs and allow the yolks to be cooked evenly.

In a seperate bowl, beat 50ml double cream with 1/2 tablespoon sugar and 1/4 vanilla pod per portion.

Add your flavouring to the egg yolk mix (still beating!), then stop beating and fold in the whipped cream. Distribute into the ramekins and freeze for a couple of hours.

To serve, remove the ramekins from the freezer and very briefly and very gently re-heat. I hold and turn each portion for 15s in my hands, t’is all. Then turn out onto a plate (a cake fork comes handy when pulling the parfait cone from the ramekin), decorate as you will (e.g. more praline dust, fruit or fruit coulis, etc), and serve immediately.

Mini Cheesecakes

20140627_181135American cheesecakes require no baking, and make for a perfect desert. Never fails to please the crowds, this one.

Just before the American Cheesecake Police gets to my throat, yes, I have seen baked cheesecake in America, too. Anyway, this one is American in style, and does not require baking.

This makes several single-portion cheesecakes, with lots of room for being creative, how’s that?

For a first step, you’d need to find a suitable form to make the cheesecakes in. Cook’s rings are ideal. I have two sets of rings, a 10cm diameter, 4cm tall one, and a narrower, taller one (approximately 65mm diameter, 70mm tall).

The plan is to provide a thin and crumbly biscuit base, topped with an American cheesecake mix, topped with something fruity. The photo shows a nectarine compote. We have also used Strawberries, Raspberries, or a delicious prickly pear compote. The sky is the limit!

For the base, per portion:

One hob-nob biscuit. Ginger biscuits are also very good and provide a slight ginger kick. For a cherry-topped version I used dark chocolate hob-nobs in reminiscence of a black forest gateaux. Just be creative at the biscuit shelf in your local superstore.

A teaspoon of dry bread crumbs and

a nob of soft unsalted butter.

Blitz the biscuits and bread crumbs ingredients in the blender, then swiftly include the butter. I find it both easy and quickly to add the butter with a fork. This makes about one heaped tablespoon of base.

Find a chopping board big enough for all your portions, and small enough to fit into your fridge. Cover it with greaseproof paper, then arrange the cooking rings. Fill each cooking ring with one tablespoon of base, distribute the base mix evenly. Wrap your masher or some other flat headed cylindrical shape with clingfilm, then use this to firm up the bases. Set aside in a cool place.

For the cheesecake mix, per 6 portions:

300g of cream cheese such as Kraft’s Philadelphia,

300g of some nice soft fresh cheese or German Quark, strained.

100g sugar,

Seeds from one pod of fresh vanilla,

Three leaves of gelatine.

Soak the gelatine in a bit of water. Meanwhile, whisk the other ingredients together, then gently melt the gelatine in the Microwave oven and add to the mix. Distribute the mix among the portion cakes, leaving space for the topping.

For the topping, use your imagination.

Strawberries are easiest, just wash and clean them, put the pretty ones upside down onto the cheesecakes and use the not-so-pretty ones to make a thick jam to coat and seal the tops.

Similar procedures apply to other fruit: a fruit topping from soft fruit or from a thick fruit jam. Cover fresh fruit with jam so that it keeps better.

Dark sweet cherries, covered with a cherry glaze (made from cherry juice, sugar and gelatine) worked out pretty well.

A skinned half Apricot, covered with a glaze made from fig jam, lime juice and gelatine, also was a hit.

Cover with cling film and allow to set in the fridge for 2 or more hours.

Easy-peasy!